 |
VR-Forces 4.8 Class Documentation
|


All Classes Namespaces Files Functions Variables Typedefs Enumerations Enumerator Properties Friends Macros Groups Pages
|
VR-Forces 4.8 Class Documentation
|
This tutorial shows how to extend an existing dialog-page to add new functionality by deriving from the existing Page class and simply adding new widgets to it. This particular example does not follow a humble-dialog pattern.
There are several ways to add or extend functionality to an existing dialog in VR-Vantage; one method is to get a handle to a page in a dialog and then insert new GUI elements, another is to derive a new GUI from an existing one. The decision as to which method to use is dependent on the needs of the developer. If the developer simply wishes to add a few more widgets to perform a few more actions, the former method (inserting new GUI elements) might be the way to go. If the task requires interacting with or augmenting the behavior of an existing dialog, even hiding or replacing existing GUI elements, then possibly the latter method (deriving a new GUI) is the proper way.
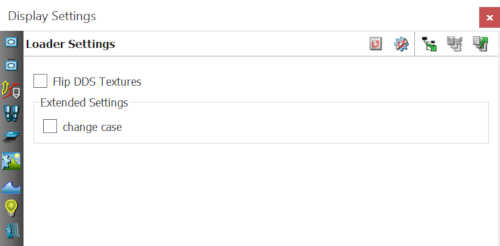
This tutorial demonstrates how to add new GUI elements to the existing dialog page. For an example of deriving a new GUI from the existing dialog page see exampleExtendDialogByDerivation. This tutorial has chosen the makVrv::DtLoaderSettingsPage as the target dialog-page to extend. The makVrv::DtLoaderSettingsPage is a dialog-page located in the Display Settings dialog found in the Settings menu (Settings->Display...). The page sits near the bottom of the page-list in the dialog. The makVrv::DtLoaderSettingsPage is a very simple dialog-page. It has a single texture setting checkbox, Flip DDS Textures. This tutorial will extend the dialog-page to include a second checkbox which, when set changes its label case.
The Loader Settings dialog-page manages a widget object containing all the GUI elements and a logic object providing functionality. This tutorial will derive the existing Loader Settings page and add more GUI elements, and will add new logic to receive input from the new GUI elements. This is to demonstrate how the extended GUI can interact with the original GUI through an extended logic object. Simply put, the new checkbox sends its state to its logic, and the logic uses that state to change case on its label.
The existing widget, DtLoaderSettingsWidget, is derived from an interface class, DtLoaderSettingsInterface, which the logic, DtLoaderSettingsLogic, communicates through. This tutorial will add a new widget, CheckBoxAdder that also implements the logic for the widget.
To manage the new widget and logic, a new dialog-page is created, ExampleExtendDialogPage, which is derived from the original page, makVrv::DtLoaderSettingsPage. Hence the existing dialog page's properties are extended. Now, by simply registering this new page's creator with the page-assembler, the existing dialog page is extended. When VR-Vantage is initialized, the creator for makVrv::DtLoaderSettingsPage is first registered using the page class name string, then the creator for the ExampleExtendDialogPage is registered with the same string, thus replacing the original. When the page-assembler builds the dialog-page, the new page will be created instead of the original page.
Finally the dialog-page and the extended widget and logic for this tutorial are all bundled up in a new ExampleExtendDialog plug-in. It is when this plug-in gets loaded that the original dialog-page is replaced with the new extended dialog-page. This tutorial does not demonstrate how to make the extended GUI element values persistent (saving and reloading state). See the exampleDialogPage example for more information on making dialog settings persistent.
For this tutorial, the task to perform is pretty simple; extend an existing dialog-page with a new checkbox that changes case on its label. The logic is implemented inside the widget.
The widget derives from QCheckBox (making it a GUI object).
The widget has its own Qt slot for catching Qt signals from the new checkbox. The implementation of this slot simply changes the label case and prints it onto the console.
During construction of the widget object, the widget connects the checkbox's stateChanged() Qt signal to the widget's own slot_onToggled() Qt slot.
When the Qt slot of the widget receives a signal that the user clicked on the new checkbox, the slot executes the logic to set the case on the widget's label.
As stated in the Overview, the standard dialogs in VR-Vantage are collections of pages. Each page is derived from a makVrv::DtPage class in the vrvCoreQt library. The DtPage class is itself derived from a QWidget so the DtPage class is a GUI element. The DtPage class is an abstract class which requires derivations of it to implement functions which return an icon, return a title and return a class-name. The DtPage class also has two more pure virtual functions that derived classes must implement: activate() and deactivate(). These two functions are called when the page is shown and hidden, respectively.
This tutorial declares its page in the ExampleExtendDialogPage.h file which is derived from makVrv::DtLoaderSettingDialogPage which is inturn derived ffrom makVrv::DtPage. The makVrv::DtLoaderSettingsPage implements the pure virtual methods that it inherits from makVrv::DtPage. Hence, our current page can handle its own properties while default behaviour is provided by its parent(makVrv::DtLoaderSettingsPage). The page is used to manage the widget object and its logic.
The ExampleExtendDialogPage.h file also declares a creator for the page using the built in template for creating pages.
The page in this tutorial creates the widget within the constructor of the page.
Three files are needed to create a plug-in.
The first file, exampleExtendDialogByAdditionPlugin.h, is used to create the dll inport/export symbols. The import/export symbol that this plug-in creates is called DT_DLL_EXAMPLEEXTENDDIALOG. It is used when declaring each of the classes used in this tutorial.
The second file, extsim_pluginInitHeader, is used to declare the entry point function for the plug-in. All VR-Vantage plug-ins use the same signature for their entry point. The signature is declared in core header file vrvCore/exportPlugin.h. Before including the core header file, the specific symbol must be defined as the import/export symbol declared in the first plug-in file exampleExtendDialogByAdditionPlugin.h.
A compilation error will occur if the DT_DE_PLUGIN_EXPORT_MACRO symbol is not declared prior to including the core header file. Finally the initializer function for this plug-in is declared.
The last file, extsim_pluginInitSource, implements both the plug-in entry point and the initializer function. All the entry point function does is call the initializer.
The plug-in initializer is more interesting. It starts by registering itself with the display engine using a standard VR-Vantage macro.
This macro ensures that the plug-in module is registered with the display engine once and only once. Next the core Qt is initialized.
When the vrvCoreQt is initialized, many types of assemblers are created and the default menus, dialogs and panels are registered. The assemblers, in this case, are used to assemble the GUI elements. After vrvCoreQt is initialized the creator for the page (The one that was constructed from a template in ExampleExtendDialogPage.h) is registered with the page assembler.
When the application is run, the Settings menu in the main menu bar pops up the same dialogs as before. When the Display... is selected the same Display Settings dialog is opened. In the same location that the makVrv::DtLoaderSettingsPage was, the new makVrv::ExampleExtendDialogPage exists. And on that page is a new checkbox.
VR-Vantage includes pre-built versions of the example plug-in. To build it yourself, follow the instructions at Building VR-Vantage Examples, Applications, and Plug-ins.
This example is a plug-in. You can run it by running ./bin64/exampleExtendDialogByAddition_stealth.bat (on Windows) or ./bin64/exampleExtendDialogByAddition_stealth.sh (on Linux). Go to menu "Settings->Display...", click on the "Loader Settings" tab (third from the bottom), the next section and checkbox added is there. For more information about running examples, please see Running Applications and Examples.
[<< Examples] [Home] [Top of Page]