This section explains how to load a FOM definition file and generate class and interaction code to support it.
7.3.1 Loading a FOM Definition File
You can load FOM definition files in the XML and OMT formats.
To load a FOM definition file:
-
Choose File -> Open. The Open File dialog box opens. You can select XML files or OMT files. If you are using HLA Evolved and you need to specify FOM modules, choose File -> Open FOM + Modules.
-
Select the file to open.
-
Click Open.
7.3.2 Selecting the Objects and Interactions to Generate
The objects and interactions in the FOM definition file are displayed as an expandable tree view (as illustrated below).
To select the objects or interactions that you want to generate:
-
Select the objects and interactions using one of the following methods:
-
Click the list item you want to select.
-
Shift-click to select a series of contiguous items.
-
Ctrl-click to select multiple non-contiguous items.
-
To select all items, choose Edit -> Select All.
-
Click the right-pointing arrow. The selected objects are displayed in the Objects/Interactions to Generate window.
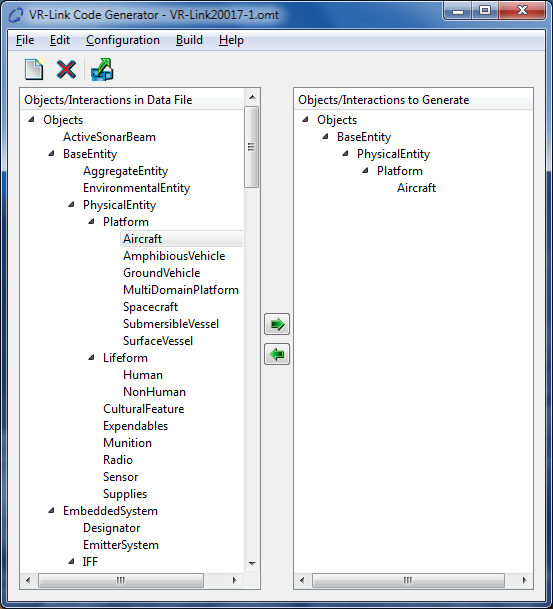
Code Generator with Definition File Loaded
-
When you add an object or interaction to the right pane, all parent objects or interactions are also added to the right pane, since the parent classes must be generated to support the children. No subordinates are moved. Therefore, if, for example, you want to generate code for the objects in the Objects.BaseEntity.PhysicalEntity.Platform category, you cannot just select Platform. You must select all the objects listed under Platform.
-
The ObjectRoot and InteractionRoot nodes are used to separate objects and interactions in the display. No code is generated for ObjectRoot or InteractionRoot.
7.3.3 Removing Classes from the Objects to Generate List
When you remove a parent from the right pane, all children are removed.
To remove a class from the Objects/Interactions to Generate list:
-
Select the class in the list.
-
Click the left-pointing arrow.
7.3.4 Configuring Code Generation Preferences
You can set the following preferences in the ./data/config/codeGenConfig.xml configuration file, the GUI, or both:
-
Namespace. You can wrap all generated code within a namespace to avoid name conflicts within VR-Link or application code. For example, if you define a data type named EntityType, it will generate code that will conflict with VR-Link's built in DtEntityType. You can specify a namespace in the configuration file by editing the namespaceName parameter. If you set this value to "" (the default), no namespace is used.
-
Create Include Directory. If selected, header files are placed in the specified directory relative to the output directory. If not selected, header files are placed in the same location as .cxx files. If header files are placed in an include directory, all .cxx files reference that directory. No changes are made to the vcproj or make files to reference the directory.
-
Prefix Classnames. Adds the specified prefix to class names. The code generator automatically adds the prefix Dt to generated classes. For example, if an object is is called MyObject, the code generator names the class DtMyObject. However, there may be times when doing so causes a conflict with an existing VR-Link class. Adding a prefix prevents these conflicts. For example, if you specify the prefix Ab, it would create the class DtAbMyObject.
-
Generate Examples. This option allows you to generate simple talk and listen examples that demonstrate how an object or interaction is used. You can specify creation of examples in the configuration file with the generateExamples parameter. The default is True.
-
Map RTIObjectId to DtGlobalObjectDesignator. The RTIObjectId is a common structure that is used to represent HLA object names. VR-Link implements it using the DtGlobalObjectDesignator. Since this structure may appear frequently, you may want to map RTIObjectId to VR-Link's internal DtGlobalObjectDesignator. If the mapping is chosen, RTIObjectId is not generated in the types or net types files. Instead, DtGlobalObjectDesignator is used in the implementation code to encode and decode this type. You can set this preference in the configuration file with the mapRtiObjectIdToGlobalId parameter. The default is True.
-
Generate #error for undecodable attributes. If set, the Code Generator inserts #error <comment> into any output for which it cannot figure out how to generate the correct code. You will need to replace this #error with valid code that correctly provides the missing functionality. If this option is not set, the code generator inserts an #include <> statement to a stub file, which the code generator will not automatically generate.
The advantage of using an #include file is that subsequent regeneration of code by the code generator will not delete functionality which you have added. This behavior is particularly useful when you are actively developing a FOM.
-
Encode Size in Strings. This option lets you customize how strings are encoded if the FOM requirements are not well defined. If clear, the code generator encodes strings based on what is indicated in the FOM.
-
Encode Size in Arrays. This option lets you customize how arrays are encoded if the FOM requirements are not well defined. If clear, the code generator encodes arrays based on what is indicated in the FOM.
-
Generate DIS PDUs. This is an experimental feature and is not supported by MAK. If checked, the Code Generator will try to produce custom DIS PDUs and a protocol-independent API. While the DIS PDUs that are generated will work, they will only work for simple FOM types, and PDUs are neither aligned or padded correctly. However, the DIS output will get you quite far in extending the object model for DIS support.
-
Save Parse Tree. This feature produces an output file that contains the internal state of the code generator's parse tree after it has parsed the FOM. Send this output to MAK when a problem arises that requires support.
To configure code generation preferences:
-
Choose Configuration -> Preferences. The Preferences dialog box opens.
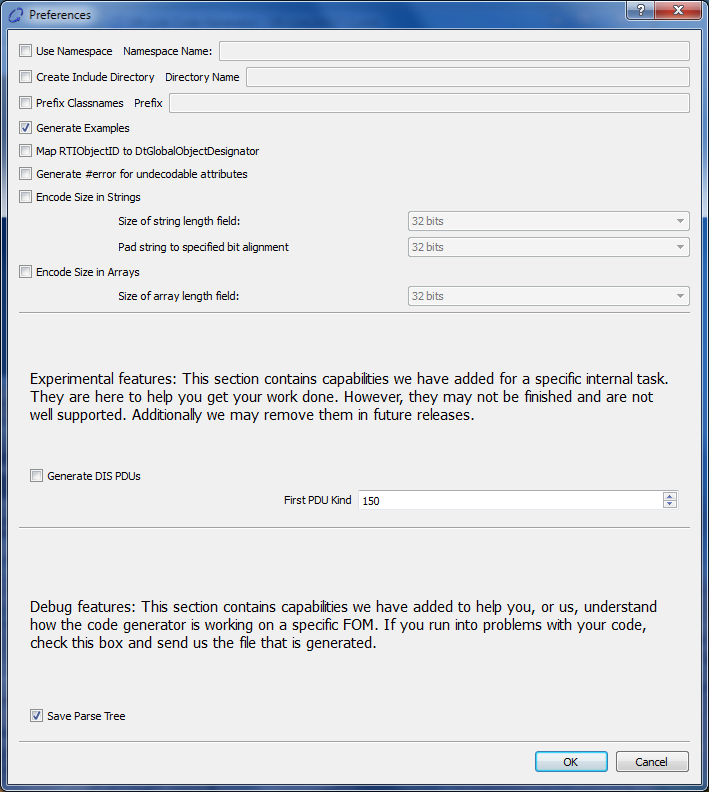
Preferences Dialog Box
-
To specify a namespace, select Use Namespace and type a name for the namespace.
-
To specify any of the other options, select the relevant check box.
-
Click OK.
7.3.5 Choosing an Output Directory
You must tell the code generator where to write its output. If you do not specify an output directory using this procedure, the first time you generate code you are prompted for an output directory. Thereafter, the code generator continues to use that output directory until you tell it to use a different one.
To specify an output directory:
-
Choose Configuration -> Choose Output Directory. A selection window opens.
-
Select the output directory.
-
Click Choose.
7.3.6 Generating Objects and Interactions
To generate the code, choose Build -> Generate, or click the Generate button.
[<< Starting the VR-Link Code Generator] [Home] [Top of Page] [The Generated Code >>]