VR-Forces 5.0.3 Developer's Guide
 All Classes Namespaces Files Functions Variables Typedefs Enumerations Enumerator Properties Friends Macros Groups Pages
exampleMultipleChannels

Table of Contents

Overview

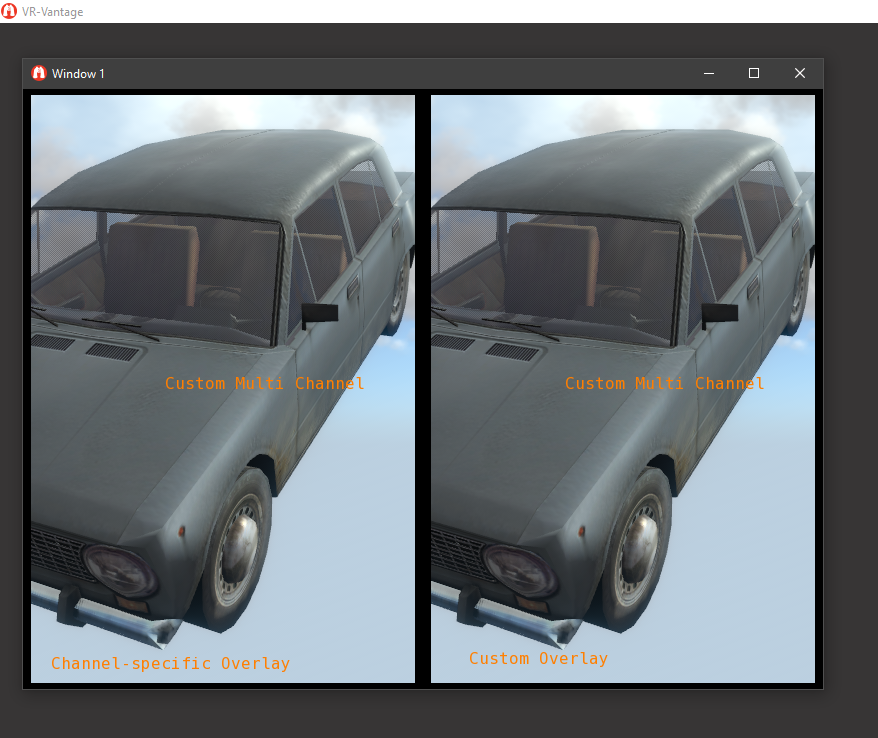
Show how to use multiple windows, each with multiple channels rendering a different model-set (with specific text overlay).

Expected Result

exampleMultipleChannelText.png
Multiple Channel Text Result

Example details

This Vantage application configures the display-engine with one window containing two channels displaying the same scene. Each channel uses a different overlay to display unique 2D text within the channel.

Building the Example

VR-Vantage includes pre-built versions of the example application. To build it yourself, follow the instructions at Building VR-Vantage Examples, Applications, and Plug-ins.

Running the Example

This example is an application. You can run it by running ./bin64/exampleMultipleChannelText.exe (on Windows) or ./bin64/exampleMultipleChannelText (on Linux). For more information about running examples, please see Running Applications and Examples.

Learn More

Example Source Files


exampleMultipleChannelText.cxx

/*****************************************************************************
* Copyright (c) 2019 MAK Technologies, Inc.
* All rights reserved.
*****************************************************************************/
#include <string>
#include <sstream>
#include <iostream>
#include <vrvCore/DtDe.h>
// Use the VR-Vantage namespace.
// All classes in VR-Vantage are in this namespace.
using namespace makVrv;
// The main function configures the display-engine with one window
// containing two channels displaying the same scene. Each channel
// uses a different overlay to display unique 2D text within the channel.
int main(int argc, char** argv)
{
// A DtVrvApplication wraps up all the components required to build a
// complete VR-Vantage application. This application configures the
// DtVrvApplication to be an Stealth application. Doing so will
// automatically read the default observer modes we wish to use.
DtVrvApplication app(config);
// Initializing the application sets up the default environment, loads
// the plug-ins and sets up the default configuration.
app.initialize(argc, argv);
// Always create the display configuration after initializing the
// application. Custom configurations added before the application is
// initialized will be overwritten with default configuration during
// initialization. The makeDisplayConfiguration() function is a custom
// function for this example. It returns full configuration for the app.
// Try to add this configuration to the Display Engine.
{
// Realize the display configuration on this display engine
// causing the windows and channels to be created.
std::string displayName = app.de().igCommunicator().name();
app.de().realizeDisplayConfiguration(displayName, dc.name());
// Create 2D Overlays per window/channel. The overlays only need
// to be created once and can be used in multiple channels. This
// app creates two overlays, one for each channel.
// Populate 2D Overlays with separate text per channel. The text
// in each channel-overlay can be manipulated during runtime. This
// app just populates the text just before rendering.
// Load all the models into the scene.
loadTheScene(app.de());
}
else
{
std::cerr << "Could not add display configuration: "
<< dc.name() << std::endl;
}
// Create an event loop and begin running the display engine.
app.run();
return 0;
}

multipleChannelTextUtilities.h

/*****************************************************************************
* Copyright (c) 2019 MAK Technologies, Inc.
* All rights reserved.
*****************************************************************************/
#pragma once
#include <matrix/vlVector.h>
#include <string>
namespace makVrv
{
class DtDe;
class DtChannel;
}
// This example provides examples of multiple ways to create and use 2D overlays
// in VR-Vantage. It creates a window with two channels. It then creates a custom
// channel-specific overlay for the second channel, and a second overlay that is
// drawn on all channels. It then shows how to put text objects onto the custom
// overlays, as well as text onto the default channel-specific for first channel.
//
const std::string& text, const DtVector& position, makVrv::DtFontSP font );
extern void create2dOverlays(makVrv::DtDe& de);
makVrv::DtDe& de, double left=0, double right=100, double bottom=0,
double top=100);
makVrv::DtDe& de, int x=100, int y=100);
makVrv::DtDe& de, const std::string& name = "My Display Configuration");
extern std::string registerModelDefinition(
makVrv::DtDe& de, const std::string& dataFile);
extern void addModelToTheScene(makVrv::DtDe& de, const std::string& modelName);

multipleChannelTextUtilities.cxx

/*****************************************************************************
* Copyright (c) 2022 MAK Technologies, Inc.
* All rights reserved.
*****************************************************************************/
#include <matrix/vlTaitBryan.h>
#include <vrvCore/DtDe.h>
#include <iostream>
#define CUSTOM_TEXT_USES_NORMALIZED_COORDS 1
// Use the VR-Vantage namespace. All classes in VR-Vantage are in this namespace.
using namespace makVrv;
// This is the filename of a model that will be added to the scene
const std::string vehicle("/ModelData/Vehicles/Wheeled/Fiat_124/Fiat_124.medf");
// Pointer to the first channel. This is how we access the default channel-
// specific overlay on channel 1
DtChannel* channel1Ptr = 0;
// Define this externally, since we need it to create the custom overlay and to
// populated it. This is how we access the custom overlay created on channel 2
DtOverlayManager::DefaultOverlays customMultiChannelOverlay =
// Use a fixed window size.
const unsigned int windowW(800);
const unsigned int windowH(600);
// Specify the window coordinates for each channel
DtVector channel1Coords( 1.0, 49.0, 0.0);
DtVector channel2Coords( 51.0, 99.0, 0.0);
#if CUSTOM_TEXT_USES_NORMALIZED_COORDS
DtVector customOverlayTextCoords( 0.1, 0.033, 0.0 );
DtVector customMC_OverlayTextCoords( 0.35, 0.5, 0. );
#else
DtVector customOverlayTextCoords( 0.01 * windowW + 20.0, 20., 0. );
DtVector customMC_OverlayTextCoords( 0.35 * windowW, 300., 0. );
#endif
DtVector channelSpecificOverlayTextCoords( channel1Coords.x() * 0.01 * windowW + 20.0, 20., 0. );
void createCustomOverlay(DtDe& de, DtChannel* channel,
{
// Get the overlay manager.
// This will create the new overlay renderer (the same call
// will get an existing one)
DtOverlayRenderer& ovlRenderer = manager.overlayRenderer( layerId );
// Create the drawable that we will put under the camera that will
// render this overlay
new DtOverlayDrawable(de, manager, *channel);
// Add the overlay to the drawable
overlayDrawable->setOverlayToRender(& ovlRenderer );
// Look up the 2D camera (a child of the channel camera).
// When using this camera, objects on the overlay are specified
// in pixels. The alternatives are:
// osgChannel->normalizedOverlayCamera()
// Overlay objects used normalized window coordinates (0. - 1.)
// osgChannel->sceneCamera()
// Overlay objects specified in local (database) coordinates
// You must also call ovlRenderer.setProjectCameraIs3D(true)
DtOsgChannel* osgChannel = dynamic_cast<DtOsgChannel*>(channel);
if (osgChannel)
{
#if CUSTOM_TEXT_USES_NORMALIZED_COORDS
DtCameraNode* d2Camera = osgChannel->normalizedOverlayCamera();
#else
DtCameraNode* d2Camera = osgChannel->overlayCamera();
#endif
if (d2Camera)
{
osg::Geode* geode = new osg::Geode;
geode->addDrawable(overlayDrawable);
d2Camera->addChild(geode);
overlayDrawable->setProjectionCamera(d2Camera);
ovlRenderer.setProjectCameraIs3D(false);
#if CUSTOM_TEXT_USES_NORMALIZED_COORDS
ovlRenderer.setProjectCameraIsNormalized(true);
#else
ovlRenderer.setProjectCameraIsNormalized(false);
#endif
}
}
}
{
// Get the overlay manager.
// This will create the new overlay renderer (the same call
// will get an existing one)
DtOverlayRenderer& ovlRenderer = manager.overlayRenderer( layerId );
DtChannelManager::ChannelMap::iterator curIter = channels.begin();
DtChannelManager::ChannelMap::iterator endIter = channels.end();
for( ; curIter != endIter; ++curIter )
{
DtOsgChannel* osgChannel = dynamic_cast<DtOsgChannel*>(curIter->second);
if (osgChannel)
{
// Create the drawable that we will put under the camera that will
// render this overlay
new DtOverlayDrawable(de, manager, *osgChannel);
// Add the overlay to the drawable
overlayDrawable->setOverlayToRender(& ovlRenderer );
#if CUSTOM_TEXT_USES_NORMALIZED_COORDS
DtCameraNode* d2Camera = osgChannel->normalizedOverlayCamera();
#else
DtCameraNode* d2Camera = osgChannel->overlayCamera();
#endif
if (d2Camera)
{
osg::Geode* geode = new osg::Geode;
geode->addDrawable(overlayDrawable);
d2Camera->addChild(geode);
overlayDrawable->setProjectionCamera(d2Camera);
ovlRenderer.setProjectCameraIs3D(false);
#if CUSTOM_TEXT_USES_NORMALIZED_COORDS
ovlRenderer.setProjectCameraIs3D(true);
#else
ovlRenderer.setProjectCameraIs3D(false);
#endif
}
}
}
}
{
// Get the window list for the display.
const DtWindowManager::WindowList& windows =
// Get the window
DtWindow* win = *(windows.begin());
// Get the channel map for the window. It maps channel names to
// DtChannel*'s.
// Use one of the existing channel-specific overlays for the first channel.
// Each channel has 2 channel specific overlays - one that uses the scene
// camera (so objects are specified in local coordinates) and one
// that uses the overlay camera (objects specified in pixel coordinates
// We don't need to do anything here except store the channel pointer;
// the channel-specific overlays already exist.
channel1Ptr = (cm.find("Channel 1"))->second;
// Now set up and create the custom overlay for the second channel
// Get Channel 2
DtChannel* channel = (cm.find("Channel 2"))->second;
// Create a custom channel-specific overlay
createCustomOverlay( de, channel, customOverlay );
// Lastly, set up a multi-channel overlay
createCustomMultiChannelOverlay( de, cm, customMultiChannelOverlay );
}
const std::string& text, const DtVector& position, DtFontSP font )
{
// Create the text object on the overlay.
DtTextProxy* textProxy = renderer.textRenderer().createProxy();
// Initialize the text.
if (textProxy)
{
textProxy->setPosition(position.x(), position.y(), position.z());
textProxy->setString(DtUnicode::fromAscii(text.c_str()));
textProxy->setColor(1.0, 0.5, 0.0, 1.0);
textProxy->setFont(font);
// Left-to-right text, set bounds to get '\n' to work
// (right-to-left text does not need bounds to get '\n' to work)
bbox.expandTo(windowW, windowH);
bbox.centerOn(Dt2dPoint(windowW / 2., windowH / 2.));
textProxy->setBounds(bbox);
}
}
{
// Get a font for the text.
DtOsgRenderer& osgRenderer(dynamic_cast<DtOsgRenderer&>(de.renderer()));
DtFontManager& fontMgr(osgRenderer.fontManager());
DtFontSP font = fontMgr.getFont( de.dePathConfiguration().resolvePath("$(SHARED_DATA_DIR)/Fonts/arial.ttf"), 16);
// Get the overlay manager
// Access the default channel-specific overlay (that uses the overlay camera)
// using the channel pointer. To get the other channel-specific overlay for
// this channel (the one that uses the scene camera) call
// manager.overlayRenderer3D( channel2Ptr ) instead.
DtOverlayRenderer& channelSpecificOvlRenderer = manager.overlayRenderer(
channel1Ptr );
putTextOnOverlay(de, channelSpecificOvlRenderer, "Channel-specific Overlay",
channelSpecificOverlayTextCoords, font);
// Access the custom overlay, using the custom overlay layer id
DtOverlayRenderer& customOvlRenderer = manager.overlayRenderer(
customOverlay );
putTextOnOverlay(de, customOvlRenderer, "Custom Overlay",
customOverlayTextCoords, font);
// Access the custom multi-channel overlay, using the custom overlay layer id
DtOverlayRenderer& customMultiChannelOvlRenderer = manager.overlayRenderer(
customMultiChannelOverlay );
putTextOnOverlay(de, customMultiChannelOvlRenderer, "Custom Multi Channel",
customMC_OverlayTextCoords, font);
}
DtDe& de, double left, double right, double bottom, double top)
{
// Id value to make the channel and observer names unique
static DtUniqueID id(1);
std::stringstream idName;
idName << " " << id++;
// Create a new observer for this channel.
oName += idName.str();
DtObserverConfiguration observerConfig(oName);
// Set the observer mode to stealth.
observerConfig.setObserverMode(std::string("3D"));
// Register the observer-configuration for the channel to use later.
// Create a channel, giving it a unique name.
cName += idName.str();
DtChannelConfiguration channelConfig(cName);
// Set the viewport for this channel (where it will render within a window).
// The default is to fill the entire window.
channelConfig.setViewport(left, right, bottom, top);
// Set the observer that the channel will use.
channelConfig.setObserverName(oName);
// return the configuration for this channel.
return channelConfig;
}
{
// Id value to make the window name unique
static DtUniqueID id(1);
std::stringstream idName;
idName << " " << id++;
// Create a window, giving it a unique name.
wName += idName.str();
DtWindowConfiguration windowConfig(wName);
// Set the type and position for this window.
windowConfig.setPosition(x, y);
windowConfig.setSize(windowW, windowH);
// Create the channel-configurations for this window.
// Note: channels are configured slightly less then window sizes
// to display a visible (black) boarder around each channel.
windowConfig.channelConfigurations().add(
makeChannelConfiguration(de, channel1Coords.x(), channel1Coords.y(), 1, 99));
windowConfig.channelConfigurations().add(
makeChannelConfiguration(de, channel2Coords.x(), channel2Coords.y(), 1, 99));
// return the configuration for this window.
return windowConfig;
}
{
// Configure a display with one window containing two channels.
dc.setName(name);
return dc;
}
std::string registerModelDefinition(DtDe& de, const std::string& dataFile)
{
// Id value to make the model name unique
static DtUniqueID id(1);
std::stringstream modelName;
modelName << "model " << id;
// Create a model definition describing the model to load.
// The DtModelDefinition class is used to describe several attributes about
// the model. This example just specifies the name of the geometry file to
// load.
DtModelDefinition md(modelName.str());
md.setParameter("filename", dataFile);
// Retrieve the DtDeSharedState from the display engine and register the
// definition. The DtDeSharedState contains a model definition manager.
// When registering with the DtDeSharedState, all distributed applications
// are notified to register the same model definition.
// return the unique name for the model definition.
++id;
return modelName.str();
}
void addModelToTheScene(DtDe& de, const std::string& modelName)
{
// Id value to make the scene-object name unique
static DtUniqueID id(1);
// Create a DtSceneObject to hold the model. DtSceneObjects provide an
// an API to 'group' multiple models together into a single association.
// The scene-object can then be used to manipulate all the associated
// models as a single entity. Among other features like positioning and
// orientating the associated models, the DtSceneObject also provides the
// ability to add models to the scene-graph and channels for rendering.
// This example creates a single DtSceneObject for each channel and
// positions its models away from the eye-point in the scene.
DtSceneObject* sceneObj = new DtSceneObject(de, id);
sceneObj->setPosition(0, DtVector(0.0f, 5.0f, 0.0f));
sceneObj->setOrientation(0, DtTaitBryan(
osg::DegreesToRadians(-150.0f),
osg::DegreesToRadians(-30.0f),
osg::DegreesToRadians(-10.0f)));
// Tell each DtSceneObject to use the model-set for a stealth window.
// Create a model and set its definition to a preregistered definition.
// A DtModel (in this case a DtOsgSimpleModel) is a managing container for
// a single model-instance. It provides rendering attributes about the
// model-instance, such as the visualizer-type for choosing which channel
// the model will render in. Each model requires a unique id. Since this
// is just an example, arbitrarily pick the same id as the scene-object.
DtOsgSimpleModel* model = new DtOsgSimpleModel(de, id);
model->setModelDefinition(modelName);
// Associate the model with the scene-object. When a model is associated
// with a scene-object, the scene-object automatically inserts the model-
// instance (within the model) into the scene-graph of the renderer in the
// appropriate channel.
sceneObj->addModel(model, 0);
++id;
}
void loadTheScene(DtDe& de)
{
std::string sharedDataPath = de.dePathConfiguration().sharedDataPath();
std::string modelName = registerModelDefinition(de, sharedDataPath+vehicle);
std::cerr << "Adding Model: [" << modelName << "] " << sharedDataPath+vehicle << std::endl;
addModelToTheScene(de, modelName);
}

[<< Examples] [Home] [Top of Page]


Document ID: Generated on Thu Jun 1 17:58:13 EDT 2023 from SVN revision 255404
Copyright © 2005-2021 MAK Technologies. All Rights Reserved (www.mak.com)