 |
VR-Forces Developer's Guide
|


All Classes Namespaces Files Functions Variables Typedefs Enumerations Enumerator Properties Friends Macros Groups Pages
|
VR-Forces Developer's Guide
|
This example shows how to create multiple windows and channels from a plug-in. It demonstrates the use of multiple windows with multiple channels each rendering the same scene, however each channel renders the scene differently.
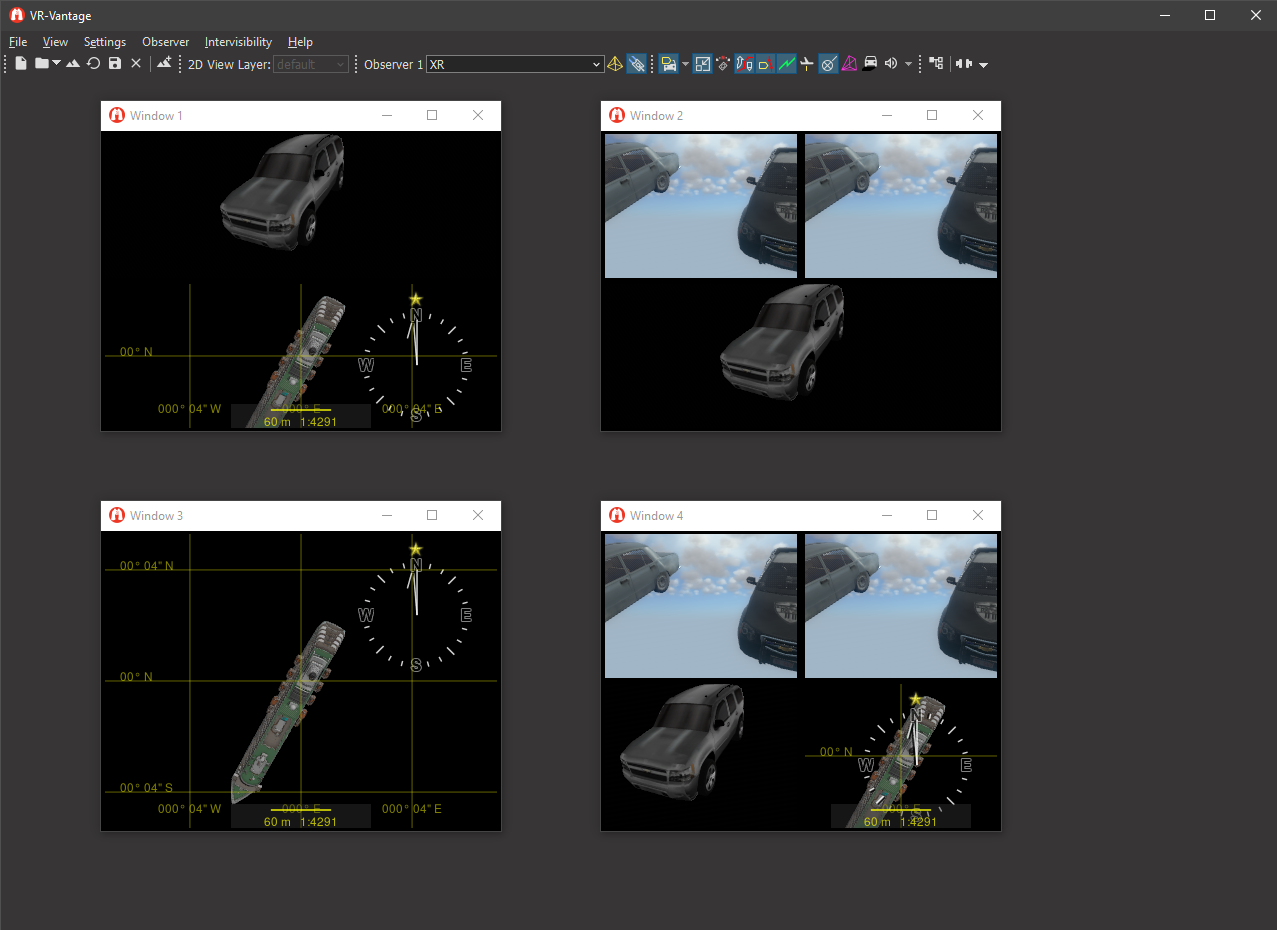
A VR-Vantage application displays one or more windows: floating, embedded or full-screen. Each window is composed of one or more channels. Each channel renders a view into the scene. Each channel has its position, orientation, and other parameters controlled by an observer.
Channels can share observers to display the same view within the scene. However, to render different views into the same scene, different observer instances per channel are required. For this example, to demonstrate how to render different model sets in each channel, multiple channels are created, each with its own observer mode configuration. When creating an observer for a channel, the observer mode is a collection of settings assigned to an observer that will ultimately be used the the channel to render the scene (such as 3-D or 2-D perspective). Among other attributes defined by the observer mode is the model set to be rendered. A model set is a collection of models that are consistent with a given projection mode (2-D or 3-D) and style (out the window or XR, e.g.). Each channel is configured with an observer mode and the observer mode defines which model set is rendered in the channel.
When models are added into the scene, they are generally added to a scene object that manages the model for use as part of one model set. The scene object positions and orients the model in the scene. It is the scene object that defines the model set for the model. When a channel is rendering the scene objects in the scene, the channel's observer will cull out scene objects that do not have a matching model set for the channel. For example, if a channel is configured with the '3-D' observer mode, the channel will only render scene objects with model set 'ModelSet_3D' (0). Scene objects with other model sets will not be rendered within that channel.
The default observer mode configurations are read from a file named 'default_ObserverModes.omcx' located in the '.../appData/settings/stealth' directory.
The two important steps to rendering different scene objects in different channels are:
This example uses four helper functions to configure the display into multiple windows with multiple channels, each with a different observer (and different observer modes).
The helper function to create the channel configurations creates a configuration for each channel with a unique channel name.
The channel's viewport is also defined.
The helper function to create the windows first creates a window configuration with a unique window name.
Then the type of window, size, and position are set in the window's configuration.
For each channel that the window displays, the window configuration is given a channel configuration by calling the helper function for channels.
The helper function to create the display configuration just creates a configuration and for each window displayed, and is given a window configuration by calling the helper function for windows.
The helper function to create the observer configurations iterates through all of the channel configures created above. For each channel configuraiton, it first a creates an observer configuration with a unique observer name.
The observer mode is defined in the observer configuration. The mode is a string matching one of the default observer modes read in at application configuration time. Then the configuration is added to the input driver's configuration (which will create all the observers based on the configuarations supplied).
This example uses three helper functions to load the geometry files into models and assign those models to scene objects, each for a different model set.
The helper function to register the model definitions takes the name of a model geometry file, creates a definition with a unique name, and registers the definition with the display engine.
The helper function to load a model into the scene creates a scene object with a unique ID, assigns a model set to the scene object, and adds a model to the scene object. The model is created with a previously registered model definition.
When the model is added to the scene object, the model is loaded from disk using the model configuration.
The helper function to load the scene just iterates over a list of filenames for models, registering their definitions and generating scene objects for each.
This example creates a plug-in that will create a custom display layout with multiple windows and overwrites the initialized default.
It is important to note that the custom display configuration must be created and registered after the default application initialization of these configurations but before they are realized. There are two places that this can happen: either a post-plug-in transform or a post-assemble plug-in. After plug-ins are loaded, the post-plug-in transforms are run; after that, the GUI is assembled; then the post-assemble transforms are invoked. The display configurations are realized after the GUI is assembled, so either transform type will work. This example uses a post-plug-in transform (which is also the appropriate place to make changes to the GUI configuration before assembly.
The post-plug-in transform creates the display configurations; removes the default configurations created during application initialization; adds the new display configurations to the application configuration; and then creates and registers a new display engine initializer that will be used actually create the displays.
The plug-in also connects to the boost signal signal_postInitialize, which will fire after the display engine has completed its initialization (including the creation of the new display/windows/channels. The method connected to the post initialize signal will call the helper function loadTheScene(de). It then connects a postTick function to the signal signal_postTick. The post tick function will call inspectDisplayWindows(de), which prints information about the windows and channels (and their observers) to the console. This is called after the first tick to guarantee that the observers have been created and assigned to the channels (postInitialize would have been too soon for that).
VR-Vantage includes prebuilt versions of the example application. To build it yourself, follow the instructions at Building VR-Vantage Examples, Applications, and Plug-ins.
This example is an plugin. You can run the VR-Vantage with this plug-in included by running ./bin64/exampleMultipleChannels.bat (on Windows) or ./bin64/exampleMultipleChannels (on Linux). For more information about running examples, please see Running Applications and Examples.
[<< Examples] [Home] [Top of Page]